|
Draw reference section
In this section each of the Draw functions, including those you used in the tutorial, are explained in depth. Don't worry if you do not understand every last word; the real way to learn Draw is by using it.
Using the Toolbox
This gives an overview of how you create and edit objects, and describes each object type on the Toolbox. When you are in the process of creating any object except text, you will see a 'skeleton' version of it on the screen.
Note that most operations can be cancelled by pressing Escape part way through.
The items in the Toolbox can also be chosen from the Tool submenu. This is outlined at the end of this section.
Paths
The top four icons in the toolbox are used for path objects To construct line segments in a path choose one of the first four icons (their meanings are given below and click SELECT at the place in the Draw window where you want the path to start Move to the end point of the line segment and click again. You can keep on adding line segments to the path by moving to the end point of each new line segment in turn and clicking. To finish creating the path, double-click or press Return.
 This is the Line tool. Using this you can create straight line segments. This is the Line tool. Using this you can create straight line segments.
 This is the Closed line tool. Using this you can also create straight line segments but when you complete the path by double-clicking, an extra line segment is inserted to join the last point to the first one. This is the Closed line tool. Using this you can also create straight line segments but when you complete the path by double-clicking, an extra line segment is inserted to join the last point to the first one.
 This is the Curved line tool. Using this you can create curved line segments. A curve is defined by the two end points and two control points. You will find a fuller explanation of control points later in this chapter. When curves are created, they are arranged so that the segments of the path join smoothly. This is the Curved line tool. Using this you can create curved line segments. A curve is defined by the two end points and two control points. You will find a fuller explanation of control points later in this chapter. When curves are created, they are arranged so that the segments of the path join smoothly.
 This is the Closed curve tool. Using this you can also create curved line segments but when the path is completed, an extra curve is inserted to join the last point to the first one. This is the Closed curve tool. Using this you can also create curved line segments but when the path is completed, an extra curve is inserted to join the last point to the first one.
 This is the Move tool. Using this you can move from one point to another without actually drawing a line yet any lines subsequently drawn are still part of the same object and linked to it. This is the Move tool. Using this you can move from one point to another without actually drawing a line yet any lines subsequently drawn are still part of the same object and linked to it.
During the construction of a path, you can freely switch between these types of line; for example, you can construct a path which begins with a straight line, then has a curved line, then moves to another point, and finally closes with a straight line.
Ellipses and rectangles
The next two icons are used to create ellipses and rectangles. Initially these are aligned with the horizontal and vertical axes. However you can subsequently rotate them to any other angle. Ellipses and rectangles are in fact just a type of path: once you have created them, you can alter them in the same way as any other path.
 This is the Ellipse tool. You can use this to create an ellipse. Ellipses are arranged to fit within a rectangular area. Click SELECT to mark the centre of this area, then move the mouse to a corner of it and click SELECT again. This is the Ellipse tool. You can use this to create an ellipse. Ellipses are arranged to fit within a rectangular area. Click SELECT to mark the centre of this area, then move the mouse to a corner of it and click SELECT again.
To create a circle, use the ellipse tool with the grid switched on.
 This is the Rectangle tool. This tool creates a rectangle. Click SELECT to mark one corner of the rectangle, then move the mouse to the other corner of it and click SELECT again This is the Rectangle tool. This tool creates a rectangle. Click SELECT to mark one corner of the rectangle, then move the mouse to the other corner of it and click SELECT again
Text
 Using this tool creates one or more text objects. Click SELECT to place a caret where you want the text to start. While you are entering text, keys such as Delete have their normal effect. Press Return, or double-click SELECT to complete the text object. Using this tool creates one or more text objects. Click SELECT to place a caret where you want the text to start. While you are entering text, keys such as Delete have their normal effect. Press Return, or double-click SELECT to complete the text object.
When you are using anti-aliased fonts, you may find the Draw window takes a long time to scroll. To improve this, use the Task manager to increase the size of the font cache.
Select mode
 Click on the arrow tool at the bottom of the Toolbox to enter Select mode. With Select mode, you can make changes to objects which are already in the diagram To return to Enter mode, click on one of the other toolbox icons. Click on the arrow tool at the bottom of the Toolbox to enter Select mode. With Select mode, you can make changes to objects which are already in the diagram To return to Enter mode, click on one of the other toolbox icons.
To select an object, position the mouse over or within the object and click SELECT. When an object is selected, a dotted box is drawn round it, with ears at two of its corners.
You can select more than one object by clicking ADJUST on each additional object. Clicking ADJUST on an object that is already selected causes it to be deselected.
To deselect an object, click ADJUST on it or click elsewhere on the screen.
Another way of selecting all the objects in an area of the diagram is to construct a select box round the area by pressing SELECT at one corner of the area to be selected and dragging the box out over the area The position at which you press SELECT to start the box must be outside any objects. Release SELECT when all the objects to be selected are wholly or partly within the select box; the objects will then be selected. If you wish to select only objects that lie wholly within the selected box, use Shift-SELECT in the same way.
You may find that the object you want to select is obscured by another object. In this case, double-click SELECT over the object. Keep on doing this to 'tunnel' down to progressively deeper objects.
There are many operations that you can carry out in Select mode. Only the simplest ones are described here; for the others, see the section entitled Editing existing objects using the Select menu.
Moving an object
To move the selected objects, press SELECT over any of the selected objects and drag them to their destination; then release SELECT.
Rotating an object
To rotate the selected objects, press SELECT over the ear at the top righthand corner of a select box, and drag the mouse until the objects are at the angle you want; then release SELECT. Each object rotates about its own centre. Note that text in System font cannot be rotated.
Shearing an object
To shear the selected objects, press ADJUST over the ear at the top righthand corner of a select box, and drag the mouse until the objects are sheared as much as you want; then release ADJUST. Each object is sheared by the same angle. The bottom left point of each object remains fixed. The shear axis is determined by which direction has the larger movement. Note that text in System font cannot be sheared.
Stretching an object
To stretch the selected objects, press SELECT over the ear at the bottom righthand corner of a select box and drag the mouse until the objects are the size and shape you want; then release SELECT. You can use this to turn objects upside down, by dragging the mouse above the top of the box.
Scaling an object
To scale the selected objects, press ADJUST over the ear at the bottom righthand corner of a select box and drag the mouse until the objects are the size you want; then release ADJUST. The objects will be scaled to the size you choose. The dimension that determines the scale factor is that which has the larger movement.
When you have more than one object selected, move, rotate, shear, stretch and scale, apply to all selected objects
The Tool submenu
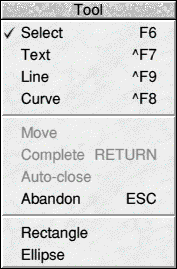
Exactly the same effects as those that can be chosen in the toolbox can also be chosen from the Tool submenu.

Line or Curve construct paths using the same method as the Toolbox.
Text, Rectangle or Ellipse also create objects of the given type in exactly the same way as the Toolbox.
Complete finishes creating a path. This has the same effect as pressing Return at the end of a path
Auto-close will set whether the path will be automatically closed when you complete it. If the line or curved line tool is selected, the Toolbox will change the selection to the corresponding closed path tool.
Abandon will abandon the path that you are constructing. It has the same effect as pressing Escape,
Move allows you to move from one point in the diagram to another without inserting a line. The move forms part of the path you are constructing. A path cannot start or end with a move, and cannot contain adjacent moves: that is, move may only be selected when a path is already in progress. Use Move to create an object consisting of subparts that you know you will always want to treat alike.
Using the Grid to place objects accurately
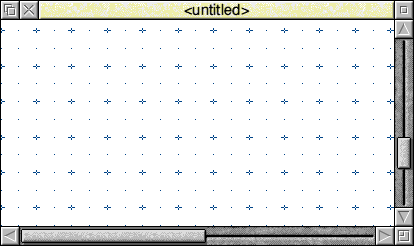
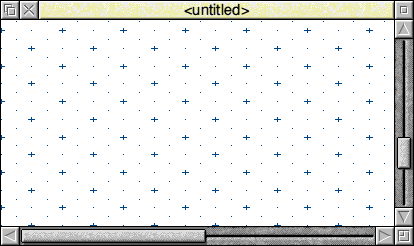
Draw can superimpose a rectangular or isometric grid on a drawing. This is often useful for lining up objects and for checking their relative size. The grid is made up of 'major points', which are marked by a cross, and 'minor points', which are marked by a dot.
You can use the grid either just as a general guide for drawing, or you can lock objects to it, so that they always align with points in the grid. When you are creating objects with grid lock turned on, you will see them attach to the nearest grid point to the mouse position.
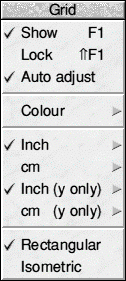
The grid is controlled from the Grid menu which is found on the Utilities menu submenu.

Show displays the grid: click on it again to remove the display.
Lock switches grid lock on or off. The grid need not be shown in order to use grid lock. Grid lock causes new objects to align with the grid as you create them. If you move an object when the grid lock is on, its bounding box will move in jumps of the grid spacing. You can make existing objects lock to the grid by choosing Snap to grid from the Select menu.
Auto adjust indicates whether Draw may change the grid if it is too dense or too sparse. When Auto adjust is turned on, Draw will insert extra minor points if the grid is very widely spaced, and remove points if they are very close together. Objects will lock only to the points that are currently displayed. If you turn Auto adjust off and specify a very close spacing, the grid may take some time to draw.
Colour sets the colour of the grid, from a range of values.
Inch and cm are used to set the spacing of the grid. Each menu item leads to a submenu, from which you can select one of a range of standard spacings. The standard spacings are expressed in the form M x S: major points are M units (inches or centimetres) apart and divided into S subdivisions; for example, 1 x 4 on the inches menu gives major points one inch apart, and minor points 1/4 inch apart. You can define your own spacing by typing values to the Spacing and Subdivision submenus. Choosing Inch or cm from the Grid submenu (without moving to Inch or cm submenus) uses the last setting you specified in that unit. For rectangular grids, changing the grid settings in this way changes both the X (horizontal) and Y (vertical) settings.
Inch (y only) and cm (y only) allow you to set a different grid setting in the Y direction from that in the X direction.
Rectangular sets the grid to a rectangular pattern.

Isometric sets the grid to an isometric pattern. In this case, the Y spacing of the grid is not used. For reasons of clarity, only those minor points lying on lines joining major points are shown; however, when grid lock is in use, the drawing still locks to intermediate minor points between them.

Advanced details
Moving a selection with grid lock on
If you move a selection when the grid lock is on, it moves in jumps of the grid spacing.
Lining up an existing selection to the grid
From the Select sub-menu, Snap to grid snaps the object's bounding box to the nearest grid point and scales the points in the object to fit the new bounding box.
Lining up object points to the grid
The Path edit menu entry Snap to grid snaps each point individually to the nearest grid point.
Zooming in and out of your drawing
Scale view , on the Utilities menu, leads to the magnifier dialogue box. This can be used to change the size at which objects are displayed relative to their actual size. You cannot set either part of the zoom ratio to a value greater than 8: if you try to do so 8 is used instead. There are three other ways of zooming
- If you want to enlarge a particular area of your work hold Shift and use ADJUST to drag a box around the area you want The window will expand if necessary and the zoom factors will be set appropriately To return to your previous scaling, press Ctrl-R.
- To zoom out press Ctrl-Q. This will change the zoom factor from, for example, 1:1 to 1:2 or from 3:1 to 2:1. Double clicking Shift-ADJUST has a similar effect.
- To zoom in press Ctrl-W. This will change the zoom factor from, for example, 1:2 to 1:1 or from 2:1 to 3:1.
From the File submenu, you can set Zoom lock. When you then zoom using one of the three methods above, the zoom ratio is forced to 1:1, 1:2, 1:4, or 1:8. and so on (and the same when zooming out). This means, for example, that each time you press Ctrl-Q, you halve the size of the drawing on the screen. When you press Ctrl-W, you double its size.
Displaying an alternative part of the same file
Choose New view, from the File sub-menu, to create a new view of the diagram you are editing, in a separate window. Changes made in any view of a diagram affect the other views as well. You can change the zoom on each view independently, use different grids in the separate views, scroll each one independently, and so on. To get rid of a view, close the window containing it.
Working with multiple Draw files
You can be working on several Draw files at the same time; simply click on the Draw icon on the icon bar to start up another Draw window.
It is easy to copy objects between Draw windows. Select the object you wish to copy and choose Copy to clipboard from the Edit menu. Now move the pointer to the destination Draw window and choose Paste clipboard from the Edit menu. The selected object is copied into the new window. Alternatively you can use the Save and Save Selection menu options to drag Draw icons into new Draw windows.
If you are working with multiple Draw windows, only one window can be selected at a time. So, if you select an object in one window and then select an object in another window, you will nullify the selection in the first window. Additionally clicking on the Draw icon to create another Draw window also nullifies any current selection.

|
![[Select]](../images/ro6doc.gif)
![[Select]](../images/ro6doc.gif)