|
www.riscos.com Technical Support: |
All printing is handled by the Printer manager, !Printers. This provides an interface between your printer and the file that is being printed.
Before you start printing, you need to set up the Printer manager so that it is using the correct printer driver for your printer and communicates correctly with it.
This chapter tells you how to set up !Printers. If your printer is already set up correctly you can find out how to print files by referring to Printing your files.
This chapter tells you how to
Before you can print from your computer, you need three things
If you are connecting to a network printer, you'll need to make sure that you have the appropriate network connection for your computer. Contact your network manager for more information.
Your supplier will advise you on suitable printers for your computer. RISC OS supports most types of popular dot matrix printer, Inkjets, as well as colour printers. It also supports laser printers compatible with the HP LaserJet as well as PostScript printers.
The following printers are among those supported:
Acorn JP150
Apple PostScript printers
Apple ImageWriter
Canon Bubblejet series
Citizen Swift series
Epson EX, FX, JX & LX series
Epson MX & LQ series
Epson Stylus Colour
HP LaserJet & DeskJet series
IBM Proprinter series
IBM PostScript printers
Integrex Colourjet
NEC P series
Olivetti JP360
QMS ColourScript
Qume ScripTEN
Star DP, LC & XB series
Star Laser Printers
TI OmniLaser printer
Most PostScript laser printers
If your printer is not on this list, check the ReadMe files in the Printers directory to see if your printer is supported. You can also often run your printer in emulation mode. Most dot-matrix printers can emulate the Epson FX or LQ printer. Most non-PostScript laser printers can emulate the HP LaserJet or DeskJet printers. Read your printer's user manual for more information.
!Printers also supports direct-drive printers. These are high performance printers that connect directly to the computer using an expansion card.
If you are connecting the printer directly to your computer you have two choices, connection via the serial port or the parallel port. If your printer can use either type of connection, use the parallel port (it's quicker!). Your supplier will be able to advise you on which port to use.
Your supplier will also be able to advise on a printer cable. If you are making one yourself, details of the pin connections from the computer's output ports can be found in the Welcome Guide. You will also need to consult your printer documentation for information on how to wire the connector to the printer. A standard PC (personal computer) printer cable will usually work.
If you are connected to a network of computers, you may have access to a network printer or printer server. Consult your network manager for more information.
Direct drive printers connect to their own expansion card inside the computer. Instructions on how to fit an expansion card are given in the Welcome Guide.
In this section we assume that you have connected your printer to one of the communication ports on your computer or that you're using a printer on a network.
The printer manager application, !Printers, provides an interface between the printer and your application software (an editor or word processor, for example). It's used for printing files, and to provide printer support for applications.
The printer manager uses printer definition files (often called printer drivers) to tell the computer what type of printer you are using. These files are contained in the directory Printing.Printers.

To load a printer definition file:
You should choose the printer definition file that is closest to the printer you have. If there isn't a file specific to your printer, you may be able to choose one that's compatible. 9-pin dot matrix printers can usually emulate the Epson FX printer, while 24-pin dot matrix printers can usually emulate the Epson LQ printer; your printer manual should give details.
Non-PostScript laser printers can often emulate the HP LaserJet, or have a compatibility mode that emulates the HP LaserJet (or DeskJet); again, your printer manual should give details.
After you have loaded your printer driver, you must choose the correct printer configuration to give the results you want.
To display the configuration window, either double-click on the printer driver in the printer control window, or click Menu on the printer entry and choose Configure.
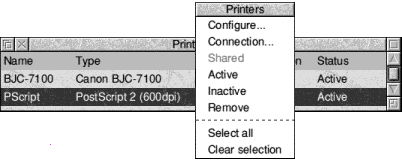
If you want to change the configuration of a printer that is already on the icon bar, click on the printer icon on the bar while holding down Shift.
There are three classes of printers:
The following subsections describe how to configure each type of printer.
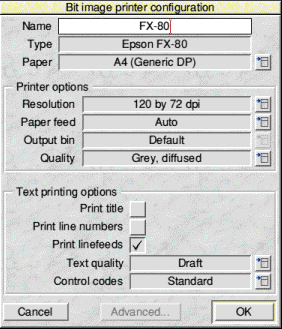
Dot matrix and inkjet-type printers use the Bit image printer configuration window.
The Name box gives the name that will appear beneath the printer icon on the icon bar. You can change this, if you wish, or leave it blank (in which case, the name is set to the connection type, e.g. Parallel).
The Paper box gives the paper size to be used by the printer. This is usually A4 (Generic DP). If you want to change the paper size, click on the menu icon; this displays the Paper sizes menu. Choose the alternative paper size you wish to use. The correct paper sizes are marked Generic DP. You can also generate other page sizes using the Edit paper sizes option from the icon bar menu.
To display the Paper feed menu, click on the menu icon. This menu lets you choose between Auto, Manual and Roll paper feed. Choose Auto if your printer has a sheet feeder or uses fanfold paper. Choose Manual if you have to insert each page by hand while printing is under way; you are prompted to insert paper at the end of each page. Choose Roll if your printer is using a paper roll.
The Quality menu lets you choose the type of printout quality. Click on the menu icon to display the menu.
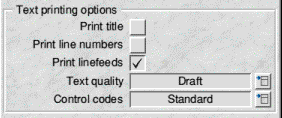
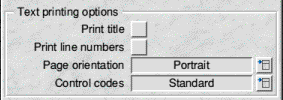
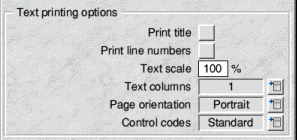
These options control the way text is printed from an editor (such as Edit).
When you have finished configuring your printer, click on OK. If you want to exit without saving your changes, click on Cancel.
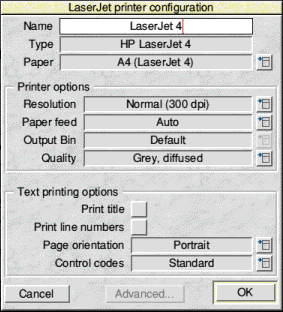
LaserJet is the collective name given to all laser printers that can emulate the HP LaserJet printer.
The Name box gives the name that will appear beneath the printer icon on the icon bar. You can change this, if you wish, or leave it blank.
The Paper box gives the paper size to be used by the printer. This is usually A4 (Generic LJ) in Europe; if you are using a DeskJet explicitly change this to A4 (Generic DeskJet). If you want to change the paper size, click on the menu icon; this displays the Paper sizes menu. Choose the alternative paper size you wish to use. The paper sizes marked Generic LJ are usually best for LaserJet type printers; paper sizes marked Generic DeskJet are usually best for DeskJet type printers (including the Acorn JP150). It is also possible to generate other page sizes using the Edit paper sizes option from the icon bar menu; see the section Editing paper sizes for more details.
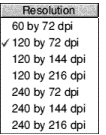
To display the printer Resolution menu, click on the menu icon. Increasing the resolution usually gives a better quality image, but printing usually takes longer. Most modern LaserJets (and LaserJet copies and clones) can use 300x300dpi. Some early models (LaserJet and LaserJet II) do not contain enough memory to print full page graphics at full resolution; in this case use 150x150dpi or purchase more memory.
To display the Paper feed menu, click on the menu icon. The menu lets you choose between Auto and Manual paper feed. Choose Auto if your printer has a sheet feeder or uses fanfold paper. Choose Manual if you have to insert each page by hand during printing.
The Quality menu lets you choose the type of printout quality. Click on the menu icon to display the menu. This will vary depending on the printer but the following options may be found.
If you are using a colour printer, you'll also be able to choose from three colour options (256, 32K and 16M colours) but printing with many colours can take a lot longer. For each colour option, you will be able to select small halftone, large halftone or error diffused.
The text printing options control the way text is printed from an editor (e.g. !Edit).
When you have finished configuring your printer, click on OK then save the setup as described 1n Saving your choices. If you want to exit without saving your changes, click on Cancel.
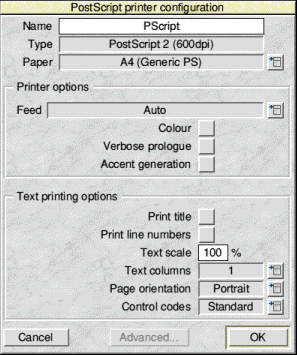
PostScript is the name given to all laser printers that are PostScript-compatible.
The Name box gives the name that will appear beneath the printer icon on the icon bar. You can change this if you wish, or leave it blank.
The Paper box gives the paper size to be used by the printer. This is usually A4 (Generic PS). If you want to change the paper size, click on the menu icon; this displays the Paper sizes menu. Choose the alternative paper size you wish to use. The paper sizes marked Generic PS are usually best for PostScript type printers. It is also possible to generate other page sizes using the Edit paper sizes option from the icon bar menu; see Editing paper sizes for more details.
To display the Paper feed menu, click on the menu icon. Normally the Paper feed option should be set to Auto. If you are feeding paper or envelopes through the manual feed choose Manual.
Choose Colour if you are printing in colour on a colour PostScript device.
Choose Verbose prologue if you wish to declare all of the PostScript printer fonts. This option gives you the same prologue as that used by the RISC OS 2.00 printer drivers; it is included for backward compatibility only. Do not choose this option unless your application requires it.
The Accent generation option will automatically generate accented characters even if they are not supported by your printer. Unless you need to print unusual accented characters such as w or y circumflex (used in Welsh) leave Accent generation off, as it slows printing and does not work with printers with small internal memory.
The text printing options allow you to control the way text is printed from an editor (such as Edit).
When you have finished configuring your printer, click on OK then save the setup as described on Saving your choices. If you want to exit without saving your changes, click on Cancel.
This section applies to both PostScript and non-PostScript printers
 |
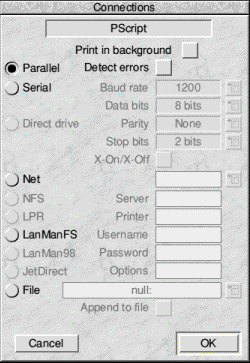
Once you have loaded the printer driver, you need to set it up so that it can communicate with the printer.
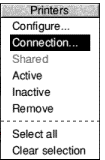
Click Menu over the Printer control window. (If you are on an Access network and wish to share the printer connected to your machine, choose Shared.) |
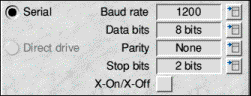
The printer driver can send printed output to the printer using one or more of the following ports
Additionally it can save printer output to a File for printing later.
The communications port you choose will depend upon your printer and printer cable. Check with your supplier for more details, or read your printer manual.
Some of the network options may be 'greyed out' so that you cannot choose them.
If you want to change the printer connection of a printer that is already set up on the icon bar, Shift-Adjust-click on the printer icon.
If you want to change the printer configuration, Shift-click on the printer icon.
If you have dragged more than one printer to the Printer control window you can activate them all. A printer icon is displayed on the icon bar for each active printer. This facility can be useful if you have a printer connected directly to your computer, and you also have access to another printer connected via a network.
Although you can have many printers activated on the icon bar, only one of these printers is highlighted; all of the others are greyed out. When you click on the Print option in an application, the file to be printed is sent to the highlighted printer.
You can choose to print using a different printer by clicking on that printer's icon on the icon bar. This highlights the new printer driver and greys out the old one.
You can also print using any of the printer drivers (highlighted or not) by dragging files directly onto the desired printer's icon.
You should save to disc any changes you make to the settings for your printer, otherwise you will have to go through the setting-up procedure again, next time you start the printer manager. To do this, choose Save choices from the printer icon bar menu.
Once you have saved your settings to disc, the printer manager automatically loads your printer driver onto the icon bar using those settings each time you start the printer manager.
if you wish, set up new page sizes for your printer. From the icon bar menu, display the Edit paper sizes dialogue box. If you use one of the standard paper sizes you need not read this section.
From this dialogue box you can select your paper size by clicking on the menu icon and choosing a paper size. For your information the standard paper sizes are:
A2: 594x420mm
A3: 420x297mm
A4: 297x210mm (the default option)
Fanfold: 279x203mm
Letter: 279.4x215.9mm
Legal: 355.6x215.9mm
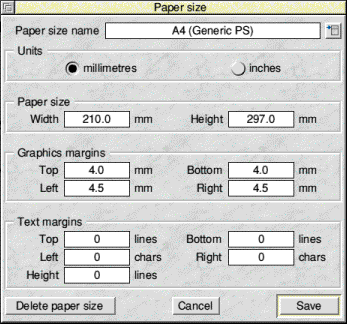
These are the generic types of page size. Additional sizes that fine-tune these dimensions are also given for the various printer types:
Once you have selected your basic paper size you can fine tune it to your own requirements. Change the name in Paper size name and change the paper height and width if you are using a special sized paper. Finally you can change the margins within which text and graphics will be printed. Click on the Save box to save the new paper dimensions for future use.
PostScript printers, and some other printers, need to know which tray to take paper from. This information is derived from the Paper size name. The name should therefore be in the form paper size (name), where the paper size is the size of the paper in the paper tray. For example, Letter (memo-letter) will use paper in the Letter tray.
Note: Don't use the plain paper sizes directly (A3 paper size for example); they are only given to define the basic paper size. Always use a paper size defined for a particular printer - A4 (Generic DeskJet), for example.
The graphics margins must reflect the true printable area of the page (look this up in your printer manual). The margins ensure that graphics are printed properly and they are also used by applications (such as Draw). The margins correspond to those of a portrait page; landscape page values are worked out automatically. The graphics margins exist to tell the printer where to print on a piece of paper. The margins cannot be used to move the printed result around on the page.
Text margins are measured as relative to the printable area of the page (defined by the graphics margins). The Left and Right margins are measured in characters and the Top and Bottom margins measured in lines. The Height is the total number of lines on a page, including the text margins. If you want to move the position of the text output on the page, alter the text margin settings.
For these printers, the total number of lines per page and characters per line are determined automatically.
The printer is configured to use 10 characters per inch and 6 lines per inch in portrait orientation and 14 characters per inch and 8.5 lines per inch in landscape orientation.
A LaserJet II cannot match these defaults exactly and uses its internal font at 10 characters per inch and 6 lines per inch in portrait orientation and 16.66 characters per inch and 8 lines per inch in landscape orientation instead.
PostScript printers determine the font size from the Text scale and Text columns values in the Configure dialogue box.
If you require an unusual page length you should set it by altering the Text margins Height box, as well as the Graphics margins. For example, if you are printing labels, you may have six rows of labels on a sheet of A4 paper. Set the Text height to be something like 11 lines so that the printer will form feed to the start of the next label correctly. This is because the Text height is used to tell the printer how long the paper is for both text and graphics printing.
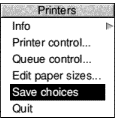 |
To save any changes you make in the Page size dialogue box, click on Save; this saves them to disc. If you wish to save the changes permanently, you should click on the Save choices option in the icon bar menu.
If you wish you can delete a paper size by selecting it and then clicking on Delete paper size. You can only delete sizes that you have created or altered. |
You can create a Printer definition file that is specifically tailored for your printer. PrintEdit allows you to create a new printer driver.