| Archimedes Gamemakers Manual | |
| Terry Blunt |
Chapter 10 - ARM Code
10.1 Reasons
The obvious reason that tempts programmers to use ARM code in a game is, of course, speed. However, there are other good reasons. You may want to run background activities such as music. RISC OS might not have a routine that you want, or only in a form that is impractical for your particular need. With practice, you can develop highly efficient, complex routines that are unimaginable on many processors, and yet seem to employ remarkably little code.
10.2 Fast Object Tables
In an earlier chapter I described the use of movement tables for sprite plotting. These are extremely easy to implement as byte arrays, putting them in a form readable within ARM code. This is particularly beneficial where, as in this case, you have one table providing pointers into another table. The sophisticated stack and indirect addressing features of the ARM processor really come into their own here. In principle listing 10.1 is only slightly changed from the original, but you will see from the number of characters printed, it runs much faster.
REM > ARMtable
:
ON ERROR PROCerror:END
PROCinitialise
PROCassemble
IF INKEY 100
CALL code%
END
:
DEF PROCerror
MODE 12
IF ERR<>17 PRINT REPORT$ " @ ";ERL
ENDPROC
:
DEF PROCinitialise
MODE 12
MODE 9
COLOUR 0,128,0,0
PRINT TAB(11,10) "ARM code movement"
PRINT TAB(9,13) "Press Escape to stop"
VDU 5
maxpoints%=200
DIM table% maxpoints%*4
numchars%=21
DIM char% numchars%*4
FOR I%=0 TO numchars%*4-4 STEP4
char%!I%=-1
NEXT
char%!(numchars%*4)=0
x%=0
y%=512
mark%=0
PROCline(40)
PROCcircle(128,1)
PROCline(10)
PROCcircle(128,-1)
PROCline(55)
ENDPROC
:
DEF PROCassemble
DIM code% &100
work=0
charbase=3
charcount=4
tablebase=5
tableindex=6
mainpointer=7
bank=8
sp=13
link=14
FOR I%=0 TO 2 STEP 2
P%=code%
[ OPT I%
STMFD(sp)!,
ADR mainpointer,charadd
LDMIA (mainpointer)!,
MOV bank,#1
.outerloop
MOV R0,#113
MOV R1,bank
SWI "OS_Byte"              ; set display bank
EOR bank,bank,#3           ; swap bank register
MOV R0,#112
MOV R1,bank
SWI "OS_Byte"              ; set write bank
SWI &10C
MOV charcount,#numchars%
.charloop
LDR tableindex,[charbase,charcount,LSL#2]
CMP tableindex,#0
BLGE move
SUBS charcount,charcount,#1
BGE charloop
MOV R0,#19
SWI "OS_Byte"              ; wait
SWI "OS_ReadEscapeState"
BCC outerloop              ; exit if Escape pressed
LDMFD(sp)!,
;
.move
LDR work,[tablebase,tableindex]
STR work,[mainpointer,#4]  ; build up
RSB R1,charcount,#(ASC"A"+numchars%)
STRB R1,[mainpointer,#8]   ; VDU string
ADD R0,mainpointer,#2
MOV R1,#7
SWI "OS_WriteN"            ; now print it
CMP tableindex,#mark%-4    ; update char position
MOVEQ work,#0
LDRNE work,[charbase,charcount,LSL#2]
ADDNE work,work,#4
STR work,[charbase,charcount,LSL#2]
CMP tableindex,#16         ; initiate next char?
MOVNE PC,link
CMP charcount,#0
MOVLE PC,link
MOV work,#0
SUB charcount,charcount,#1
STR work,[charbase,charcount,LSL#2]
MOV PC,link
.charadd
EQUD char%
EQUD table%
EQUW 0    ; two dummy alignment bytes
EQUB 25   ; plot
EQUB 4    ; move
EQUD 0    ; x co-ordinate
EQUD 0    ; y co-ordinate
EQUB 0    ; character
]
NEXT
ENDPROC
:
DEF PROCline(n%)
FOR I%=0 TO n%
x%+=12
table%!mark%=x%
mark%+=2
table%!mark%=y%
mark%+=2
NEXT
ENDPROC
:
DEF PROCcircle(rad%,dir%)
start=-PI/2
step=PI/20
end=start+PI*2+step
FOR I=start TO end STEP step
table%!mark%=x%+COS(I*dir%)*rad%
mark%+=2
table%!mark%=y%+SIN(I*dir%)*rad%+rad%*dir%
mark%+=2
NEXT
ENDPROC
To get the fastest possible character printing the move and print commands are combined in a single VDU string. OS_WriteN uses the low-level VDU drivers, so is very much faster than individual calls to OS_WriteC would be.
As the Y coordinate in the VDU string follows the X coordinate only two bytes later it makes sense to set up a single interleaved table for both. Values taken from this can then be handled as whole registers by the ARM routine. The fiddle with the address of the VDU string ensures that data is word aligned, and therefore most efficient, for all instructions apart from the actual VDU call itself.
A point of interest is where I've used the load multiple registers instruction to set up the charbase and tablebase pointers, while leaving mainpointer at a sensible position for both filling and printing the VDU string. It is always worth trying to get as much out of your load and store instructions as you can, as these are the most time hungry operations.
10.3 Direct Screen Manipulation
In some earlier code fragments there was a degree of screen handling but at a rather crude level. Once you start to use ARM code the speed of execution is so much faster that detailed screen handling becomes practical. When selecting screen modes you should bear in mind that it is far easier to handle modes where one byte represents one pixel, namely the 256 colour modes. Lower resolution modes may have two or four pixels and Mode 0 eight. If you use these modes you will have to do a lot of bit manipulation to get full pixel control, so it may not be worth the effort. However, if your routines can usefully handle adjacent pairs of pixels then 16 colour modes become as easy to handle as the 256 colour modes.
Programmers with experience with the older BBC Model B were pleased to find that the Archimedes screen is handled as one continuous line of bytes, scanning from left to right, in a similar fashion to the VDU itself. To obtain access to this the operating system allows you to read not only the current start of the screen in memory but its size and the length of the lines in bytes, and therefore by simple division the number of lines in the screen.
The screen storing routine of Chapter 4 used this to get all the information it needs to correctly find the start of the screen, allow for which screen bank was currently displayed, and then copy it line by line to the memory area reserved for it. However, you can do far more than this.
You have probably seen a number of impressive demos. One of the commonest features of these are various starfields. Listing 10.2 is a sideways scrolling starfield generator that is remarkably simple to implement. It uses a plot-move-rubout technique for a smooth scrolling effect without the need of banked screens. The twinkling effect that sometimes takes place is due to the occasional plotting of one star directly on top of another and actually enhances the effect.
REM > Starfield
:
PROCinitialise
PROCassemble
PROCfill
GCOL%110101
RECTANGLE FILL 0,0,1279,255
RECTANGLE FILL 0,768,1279,1023
PRINT TAB(10,27) "Press Escape to stop"
CALL code%
END
:
DEF PROCinitialise
MODE 13
OFF
PRINT TAB(12,7) "Please wait"
DIM block% 19
block%!0=148:        REM screen base address
block%!4=7:          REM screen size
block%!8=-1
SYS "OS_ReadVduVariables",block%,block%+12
screen%=block%!12
size%=block%!16>>1:  REM only want a half screen
screen%+=(size%>>1): REM offset by a quarter screen
stars%=2048
ENDPROC
:
DEF PROCassemble
DIM code% &50+stars%*3
fx=0
offset=1
speed=2
colour=3
screenbase=4
stack=5
end=6
new=7
blank=8
sp=13
link=14
FOR I%=0 TO 2 STEP 2
P%=code%
[ OPT I%
MOV    blank,#0
MOV    fx,#19
LDR    screenbase,start
LDR    end,stop
.scroll
ADR    stack,index
.pass
LDMIA  (stack)!,
SUBS   new,offset,speed
MOVMI  new,#size%<<1
STR    new,[stack,#-12]
STRB   blank,[screenbase,offset,LSR #1]
STRB   colour,[screenbase,new,LSR #1]
CMP    stack,end
BLT    pass
SWI    "OS_Byte"
SWI    "OS_ReadEscapeState"
BCC    scroll
MOV    PC,link
:
.start
EQUD   screen%
.stop
EQUD   index+stars%*3
.index
]
NEXT
ENDPROC
:
DEF PROCfill
N%=index
FOR I%=1 TO stars%
R%=RND(4)
S%=RND(4)
IF R%=4 AND RND(3)>1 R%=1
IF R%=3 AND RND(2)=1 R%=0
!N%=RND(size%<<1)
N%!4=R%+S%-1
CASE R% OF
WHEN 0:N%!8=3
WHEN 1:N%!8=3
WHEN 2:N%!8=S%+43
WHEN 3:N%!8=S%+207
WHEN 4:N%!8=S%+251
ENDCASE
N%+=12
NEXT
ENDPROC
The operation of this program relies on the fact that, as mentioned before, the screen can be regarded simply as a long line of bytes. Once you know where the start of this line is and its length you can put bytes directly to this area using the screen start, or base address, with an offset that you know is no greater than the size of the screen. To get movement sideways you merely add or subtract a small amount from the address used for putting each byte. If you know the number of bytes in a screen line, also available from the same OS call, then adding and subtracting multiples of this will have the effect of moving points up and down.
There is quite a complex relationship between the on-screen colours and the byte values associated with them. The easiest way to find out which byte values to use is to plot the colour you want to the top corner of the screen then read it back with an indirection 'peek' having first found the start of the screen. This is shown in the following fragment.
DIM block% 11
!block%=148
block%!4=-1
SYS "OS_ReadVduVariables",block%,block%+8
screen%=block%!8
GCOL%100111 TINT &40: REM the colour you want to find
POINT 0,1023
PRINT ?screen%
10.4 ARM Sprites
If you've decided to program that ultimate fast action super invaders game that everyone will be amazed by, then I'm afraid you will have to abandon, not only Basic, but also the sprite handler itself. Acorn's handler is intended to be a general purpose tool, which will perform well over a wide range of screen modes, inside and outside the desktop. What you really need is a dedicated sprite controller, that has none of the overheads of the RISC OS sprite handler.
The sprites you want to define will be intended to operate in only one mode, with a fixed palette, and in all probability at a fixed scale. Your sprites won't need names in string form, nor will they need to carry their size information because you will access them from a lookup table of address offsets screen positions, and possibly and sizes as well. This table will have been created at the same time as the sprites, probably in some other generating program, and then saved as a data file along with your sprites.
10.4.1 Simple Sprites
We will start by looking at the easiest to produce, that is, sprites that are intended to go only on a single colour background, where overlapping is unimportant, as these sprites don't require any complicated masking to be performed. Where you have sprites of different sizes, it is often worth using separate dedicated routines for each sprite size.
Another point worth consideration is if you can fiddle the sprite size and screen positions so that you are always working word aligned. If you can do this, you can make dramatic gains in speed and efficiency. Listing 10.3 shows this in action.
REM > ARMsprite
:
ON ERROR PROCerror:END
PROCinitialise
PROCfill
PROCassemble
CALL code%
END
:
DEF PROCerror
MODE 12
IF ERR<>17 PRINT REPORT$ " @ ";ERL
ENDPROC
:
DEF PROCinitialise
MODE 15
MODE 13
OFF
PRINT TAB(12,7) "Please wait" TAB(11,11) "Escape to stop"
COLOUR 130
numsprites%=52
spritewidth%=32
spriteheight%=32
colours%=8
DIM block% 15,b2% 15
block%!0=149:        REM screen base address
block%!4=7:          REM screen size
block%!8=6:          REM line length
block%!12=-1
SYS "OS_ReadVduVariables",block%,b2%
screen%=b2%!0
size%=b2%!4
line%=b2%!8
height%=size% DIV line%
DIM table% numsprites%*20
DIM spritearea% colours%*spritewidth%*spriteheight%
ENDPROC
:
DEF PROCfill
FOR K%=0 TO colours%-1
FOR J%=0 TO spriteheight%-1
FOR I%=0 TO spritewidth%-1 STEP 4
V%=spritearea%+(K%*spriteheight%*spritewidth%+J%*spritewidth%+I%)
b%=K%*32+RND(16)+8
IF I%>15 AND J%<15 OR I%<15 AND J%>15 !V%=b%+(b%<<8)+(b%<<16)+(b%<<24) ELSE !V%=0
NEXT
NEXT
NEXT
FOR K%=0 TO numsprites%-1
table%!(K%*20)=(RND(3)-2)*4
table%!(K%*20+4)=(RND(3)-2)*line%
table%!(K%*20+8)=RND((line%-spritewidth%)DIV 4-1)*4
table%!(K%*20+12)=RND(height%-spriteheight%-3)*line%+line%
table%!(K%*20+16)=(K% MOD colours%)*spriteheight%*spritewidth%+spritearea%
NEXT
ENDPROC
:
DEF PROCassemble
DIM code% &100
work=0
dX=2
dY=3
Xpos=4
Ypos=5
spritedata=6
datablock=7
dataline=8
tablepointer=9
screenbase=10
tablebase=11
bank=12
sp=13
link=14
FOR I%=0 TO 2 STEP 2
P%=code%
[ OPT I%
STMFD (sp)!,
MOV bank,#1
ADR work,screenadd
LDMIA (work)!,
.mainloop
MOV R0,#19              ; usual screen bank
SWI "OS_Byte"
MOV R0,#113
MOV R1,bank
SWI "OS_Byte"
EOR bank,bank,#3        ; display and write
MOV R0,#112
MOV R1,bank
SWI "OS_Byte"
SWI &10C                ; and clear screen
CMP bank,#2
ADDEQ screenbase,screenbase,#size%  ; ensure we write
SUBNE screenbase,screenbase,#size%  ; to correct bank
MOV tablepointer,#numsprites%-1     ; get count then x 20
ADD tablepointer,tablepointer,tablepointer,LSL #2
ADD tablepointer,tablebase,tablepointer,LSL #2
.spriteloop
BL plot
SUB tablepointer,tablepointer,#20
CMP tablepointer,tablebase
BGE spriteloop
SWI "OS_ReadEscapeState"
BCC mainloop
LDMFD (sp)!,
;
.plot
LDMIA (tablepointer),
;
CMP Xpos,#0
CMPNE Xpos,#line%-spritewidth%
MVNEQ dX,dX
ADDEQ dX,dX,#1          ; check X limits
;
CMP Ypos,#line%
ADD work,Ypos,#line%*(spriteheight%)
CMPNE work,#size%
MVNEQ dY,dY
ADDEQ dY,dY,#1          ; check Y limits
;
ADD Xpos,Xpos,dX        ; update positions
ADD Ypos,Ypos,dY        ; and store
STMIA (tablepointer),
;
ADD Xpos,Xpos,screenbase
ADD Xpos,Xpos,Ypos
ADD datablock,spritedata,#spritewidth%*spriteheight%
;
.block
ADD dataline,spritedata,#spritewidth%
.line
LDMIA (spritedata)!, ; slop it over in
STMIA (Xpos)!,       ; 4 regiser lumps
CMP spritedata,dataline
BLT line
ADD Xpos,Xpos,#line%-spritewidth%
CMP spritedata,datablock
BLT block
MOV PC,link
.screenadd
EQUD screen%
EQUD table%
]
NEXT
ENDPROC
Because we are using our own dedicated sprites in a known screen configuration there is a lot of information we don't need to store that would be essential in Acorn's generalised sprite handling routines.
Although simple this sprite plotting routine is quite impressive, and certainly useful for creating backgrounds or non colliding monsters. It can plot over 50 sprites of 32 x 32 pixels at 50 frames per second without any jitter. This is largely due to keeping everything word aligned, hence there are movement restrictions. One result is that horizontal and vertical movement can only be in powers of two.
There is the added proviso that for smooth action the minimum value for horizontal movement is four, so as it stands vertical movement can be slower than horizontal movement while remaining smooth. This is not necessarily a disadvantage. A close look at some commercial games will reveal that other programmers have discovered this!
You should bear in mind that the routine can only handle sprites that stay on the screen all the time, and in this particular example only primitive edge detection has been used so you can't reliably change the movement speeds at all.
The sprite plotter uses a single, word aligned table with five words for each sprite, as shown.
byte offset function
+0 horizontal movement
+4 vertical movement
+8 horizontal position
+12 vertical position
+16 address of sprite data
Further efficiency is gained by keeping the width of the sprites themselves to multiples of 16 bytes. This allows us to use multiple register loads and saves, using four registers at a time, in the main plotting loop.
You will see that all vertical position and movement calculations are kept in line multiples. This avoids time wasting multiplication. Simple additive increments, calculated at the end of each plotting line, are all that is needed to keep the pointers in step.
To make the best use of the registers available some of them are overwritten in the main plotting routine. This does no harm as they are finished with by then. It is a point you need to watch very carefully though. It is remarkably easy to forget, and try to re-use a register that was a pointer of some sort, only to get Address Exception, or Abort on data transfer errors.
It is false economy to try to make one plotting routine do several different jobs with extra, time wasting, flags and tests to identify each type of sprite action. If, for example, you want to include some non-word aligned sprites you should use a completely separate routine for these, bearing in mind that you won't be able to have anything like the same number for the same plotting speed.
These dedicated routines can be made so short that there probably is little overall difference in length of code, allowing for the extra code that would have been needed to identify different sprite types. Added to this is the fact that the code length will probably be quite insignificant compared with the sprite data anyway.
10.4.2 Masking
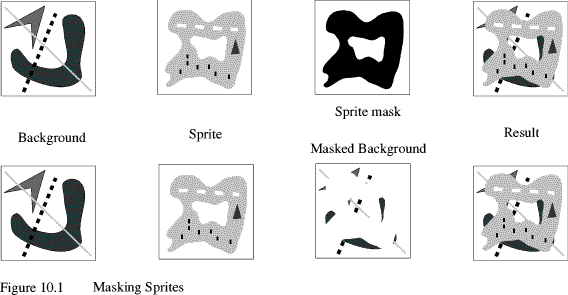
Where you want sprites to appear to sit on top of the background you need to identify which parts of the sprite are solid and which parts are transparent. This is masking, in exactly the same way as you might use a stencil to mask areas of lettering on a piece of paper.
There are two ways you can mask sprites. One way, only really practical in 256 colour modes, is to scan the sprite byte by byte, comparing it with the mask. Wherever you have a 1 byte in the mask, you plot the corresponding byte from the true sprite to the screen. This is rather tedious and forces you to work only one byte at a time.
A better method seems slower at first, but is actually much faster, as you are back to using whole registers. In this case, it isn't the sprite that's masked, but the screen. Here you load a word from the screen at the address where the sprite is to be plotted. This you AND with a mask that has the negative of the sprite pattern. This means you have a shell of background screen. This is then ORed with the corresponding word of the true sprite, and the composite word plotted back to the screen.
Figure 10.1 shows the two types of mask with their corresponding sprite patterns.
10.4.3 ARM Collisions
Although not obvious at first using the background and merging it with your sprites gets you half way towards a very accurate collision system. Indeed it can almost be called the ultimate pixel collision system.
When you load the background, instead of directly masking it for the sprites, you first store a negatively masked copy of it in a spare register. This is then tested against a one word bit pattern. If it matches, then the word you are about to plot on top of is a colliding object. This you flag, then carry on as before, merging the background with the sprite and plotting. When the sprite has been completely plotted you can then examine the flag, knowing the collision details.
Listing 10.4 shows this masked sprite technique. It is largely derived from our earlier sprite program but in this example only 20 sprites can be reliably plotted at the 50 frame rate. As a point of interest, if you don't have the collision tests, you still only get 25 sprites, so the main time overhead is the extra loading of data.
Colliding sprites are simply flagged as dead in our example. A dead sprite has its X coordinate set to &FF000000, an impossible coordinate value. You could, if you like, have a routine to restore a rational X coordinate and bring the sprite back to life. Also, instead of killing the sprite, you may decide to insert a bounce routine.
As we are using all the registers very heavily I had to pick a figure that is equally impossible as a value for work or for bit pattern. The dead flag is actually stored outside the plotting routine. Using register values outside the subroutine that handles them is a bit naughty, so you have to be very careful to ensure that you know exactly what could be thrown back as you exit.
REM > ARMmask
:
ON ERROR PROCerror:END
PROCinitialise
PROCfill
PROCassemble
CALL code%
END
:
DEF PROCerror
MODE 12
IF ERR<>17 PRINT REPORT$ " @ ";ERL
ENDPROC
:
DEF PROCinitialise
MODE 15
MODE 13
OFF
PRINT TAB(12,7) "Please wait" TAB(11,11) "Escape to stop"
COLOUR 130
numsprites%=20
spritewidth%=32
spriteheight%=32
colours%=8
DIM block% 15,b2% 15
block%!0=149:        REM screen base address
block%!4=7:          REM screen size
block%!8=6:          REM line length
block%!12=-1
SYS "OS_ReadVduVariables",block%,b2%
screen%=b2%!0
size%=b2%!4
line%=b2%!8
height%=size% DIV line%
DIM table% numsprites%*24
masks%=colours%*spritewidth%*spriteheight%
DIM spritearea% masks%*2
ENDPROC
:
DEF PROCfill
FOR K%=0 TO colours%-1
FOR J%=0 TO spriteheight%-1
FOR I%=0 TO spritewidth%-1 STEP 4
V%=spritearea%+(K%*spriteheight%*spritewidth%+J%*spritewidth%+I%)
IF I%>15 AND J%<15 OR I%<15 AND J%>15 THEN
b%=K%*32+RND(16)+8
!V%=b%+(b%<<8)+(b%<<16)+(b%<<24)
V%!masks%=0
ELSE
!V%=0
V%!masks%=&FFFFFFFF
ENDIF
NEXT
NEXT
NEXT
FOR K%=0 TO numsprites%-1
table%!(K%*24)=(RND(3)-2)*4
table%!(K%*24+4)=(RND(3)-2)*line%
table%!(K%*24+8)=RND((line%-spritewidth%)DIV 4-1)*4
table%!(K%*24+12)=RND(height%-spriteheight%-3)*line%+line%
table%!(K%*24+16)=(K% MOD colours%)*spriteheight%*spritewidth%+spritearea%
table%!(K%*24+20)=&EAEAEAEA  :REM collision bit pattern
NEXT
ENDPROC
:
DEF PROCassemble
DIM code% &200
work=0
dX=2
dY=3
Xpos=4
Ypos=5
datablock=5
mask=5
dataline=6
spritedata=7
bitpattern=8
tablepointer=9
screenbase=10
tablebase=11
bank=12
sp=13
link=14
maskdata=14
FOR I%=0 TO 2 STEP 2
P%=code%
[ OPT I%
STMFD (sp)!,
MOV bank,#1
ADR work,screenadd
LDMIA (work)!,
.mainloop
MOV R0,#19                 ; usual screen bank
SWI "OS_Byte"
MOV R0,#113
MOV R1,bank
SWI "OS_Byte"
EOR bank,bank,#3           ; display and write
MOV R0,#112
MOV R1,bank
SWI "OS_Byte"
SWI &10C                   ; and clear screen
CMP bank,#2
ADDEQ screenbase,screenbase,#size%  ; ensure we write
SUBNE screenbase,screenbase,#size%  ; to correct bank
MOV tablepointer,#numsprites%-1     ; get count then x 24
ADD tablepointer,tablepointer,tablepointer,LSL #1
ADD tablepointer,tablebase,tablepointer,LSL #3
.spriteloop
BL plot
CMP work,#&FF0000       ; collision flag
;
;  bitpattern holds type of collision
;  tablepointer points to colliding sprite
;
SWIEQ &107
STREQ work,[tablepointer,#8]  ; kill sprite
SUB tablepointer,tablepointer,#24
CMP tablepointer,tablebase
BGE spriteloop
SWI "OS_ReadEscapeState"
BCC mainloop
LDMFD (sp)!,
;
.plot
LDMIA (tablepointer),
TST Xpos,#&FF0000
MOVNE PC,link              ; dont bother with dead ones
;
CMP Xpos,#0                ; check X limits
CMPNE Xpos,#line%-spritewidth%
MVNEQ dX,dX
ADDEQ dX,dX,#1
;
CMP Ypos,#line%            ; check Y limits
ADD work,Ypos,#line%*(spriteheight%)
CMPNE work,#size%
MVNEQ dY,dY
ADDEQ dY,dY,#1
;
ADD Xpos,Xpos,dX           ; update positions
ADD Ypos,Ypos,dY
STMIA (tablepointer),    ; store them
;
ADD Xpos,Xpos,screenbase
ADD Xpos,Xpos,Ypos
ADD datablock,spritedata,#spritewidth%*spriteheight%
;
STMFD (sp)!,; grab more regs
ADD maskdata,spritedata,#masks%             ; get mask address
;
.block
ADD dataline,spritedata,#spritewidth%
.line
LDMIA (maskdata)!, ; load mask
LDMIA (Xpos),       ; get background but don't inc
;
BIC mask,R0,R9             ; mask background to sprite shape
TEQ mask,bitpattern        ; match bit pattern
BICNE mask,R1,R10
TEQNE mask,bitpattern
BICNE mask,R2,R11
TEQNE mask,bitpattern
BICNE mask,R3,R12
TEQNE mask,bitpattern
;
MOVEQ bitpattern,#&FF0000  ; flag collision
                           ;       (unlikely bit pattern)
AND R9,R9,R0               ; mask out sprite shape
AND R10,R10,R1
AND R11,R11,R2
AND R12,R12,R3
;
LDMIA (spritedata)!,; get sprite
;
ORR R0,R0,R9               ; merge sprite with background
ORR R1,R1,R10
ORR R2,R2,R11
ORR R3,R3,R12
;
STMIA (Xpos)!,      ; put to screen and increment
CMP spritedata,dataline
BLT line
ADD Xpos,Xpos,#line%-spritewidth%
LDR datablock,[sp]         ; need datablock again
CMP spritedata,datablock
BLT block
MOV work,bitpattern
LDMFD (sp)!, ; tidy up
;
.screenadd
EQUD screen%
EQUD table%
]
NEXT
ENDPROC
There are two particularly significant points about this collision system. The first is that, without any special effort on your part, it will only make the tests that are really necessary. This is because each sprite only looks at what is already on the screen, so it is only going to see collisions with sprites that have already been plotted. Any that are not being plotted for any reason aren't tested.
The second point is that each sprite can be arranged to recognise a different bit pattern so colours can be used to group sprites into colliding and non-colliding sets. In our example I've set the bit pattern for all sprites to recognise only a pale blue. This has an interesting side effect. As the first few sprites to be plotted are reds and greens these can never recognise blues as they are all plotted later, nor can they ever be recognised as colliding objects.
Careful selection of plotting order and bit patterns can produce highly detailed collision recognition with very little extra code overhead. It is especially pleasing to be able to do this without making any alteration to the plotting routine itself.
10.5 Reflected Images
You can produce quite startling effects by using mirror images of objects, part objects or backgrounds. While quite impractical in Basic these effects are very easy to produce in ARM code.
The simplest is where the top half of the screen is folded down onto the bottom half. As the screen is a continuous line of bytes it is obvious that if you divide the screen size by two you have the halves necessary for mirroring. At first you might be tempted to use two counters, one stepping forwards and the other backwards, until they meet in the middle. This will give a mirror image, but unfortunately it will also be reversed left to right. Worse still, if you use blocks of registers for the copying you get stripes of forward image, but stepped in the wrong direction. That may actually be useful with a symmetrical layout or for special effects, but not for just vertical mirroring. To do this you need to reverse the order the lines are counted in, but not the way the bytes on each line are arranged.
As you are working in lines you may wish to keep a line count for both halves of the screen, the source and destination counters. In fact you only need do this for one. Assuming you are copying from top to bottom, the source counter only needs to be checked against the mid point. This determines the end of the whole reflection. The destination, however, needs to start at the last line of the screen. It is then checked against a marker that is exactly one line higher. When the two are equal, the destination counter has two lines subtracted from it (not one), and the marker has one line subtracted. This is repeated until the reflection is completed.
Left to right mirroring is harder because the order of bytes must be reversed. While it is easier to do byte at a time it is also slow, and if you use anything other than a 256 colour mode you will still have to reverse some of the bits in each byte.
The solution is to load whole registers, swap their bits into other registers, then store the reversed registers. If you look at figure 10.2 you will see just how this looks with a Mode 13 screen. This is marked out in pixel blocks. Obviously, only the first few bytes of the lines are shown, and only for three lines. You can see that not only do the registers themselves swap, but as one byte represents exactly one pixel, the bytes themselves are in reverse order.
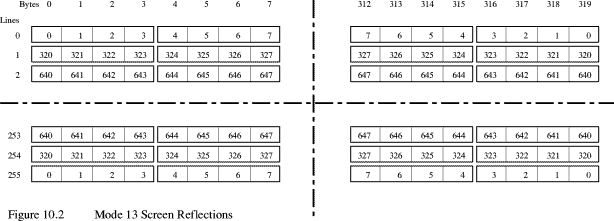
A method of making this reversal for a 256 colour mode is shown in the fragment below. In this case we need to reverse the order of whole bytes. The register to be reversed is R0 and the result is obtained in R1. R0 itself remains unaltered.
MOV R1,#0            ; clear results
MOV R3,#&FF
ORR R3,R3,R3,LSL#16  ; create mask
AND R2,R0,R3
ORR R1,R1,R2,ROR#8
MVN R3,R3            ; invert mask
AND R2,R0,R3
ORR R1,R1,R2,ROR#24
You can use this method to reverse a group of registers by interleaving them. This will improve overall efficiency as the mask in R3 will only have to be built up once, and inverted once for the whole group of registers.
Having resolved the detail, we can look at the overall reflection. What we need to do, assuming left to right reflecting, is to count up for half a line from the left for the source, while counting down from the end of the same line for the destination. When the two counters are equal, half line is added to the source register and a line and a half to the destination. This is repeated until the half line addition on the source exceeds the end of the screen.
With a bit of thought you can produce a routine that will take just one quadrant of the screen and reflect it both ways, but I'll leave the subject for now, with a novel reflection program that adds both distortion and tinting. This is in listing 10.5 where you can see that only one if four lines are picked from the source, which now extends over three quarters of the screen. The registers holding the screen data are then masked to give a red tint, and stored as consecutive lines, giving a squashed effect.
10.6 ARM Scrolling
In an earlier chapter I referred briefly to scrolling in ARM code. Although there are many possibilities for this, I'll only be covering a single basic method. This is a windowing technique. Listing 10.6 is a program that produces three such windows, controlled independently, onto the same Mode 13 scene. The scrollable area is exactly one screen in size. This allows us to use bank switching and normal graphic commands to produce the scene, and even update it later. The simple circle plotting is duplicated in some cases. This is so that objects that overlap the screen edges appear to wrap round, giving the appearance of an infinite area.
REM > ARMscroll
:
REM A% = start position in stored screen
REM B% = display start
REM C% = display width
REM D% = display height
REM E% = screen base
REM F% = screen size
REM G% = line length
:
ON ERROR PROCerror:END
PROCinitialise
PROCassemble
PROCdraw
REPEAT
IF INKEY-98 X%+=4:IF X%>edge% X%-=G%
IF INKEY-67 X%-=4:IF X%<0 X%+=G%
IF INKEY-80 Y%+=vert%:IF Y%>top% Y%-=F%
IF INKEY-105 Y%-=vert%:IF Y%<0 Y%+=F%
IF INKEY-122 PROCshiftx(4)
IF INKEY-26 PROCshiftx(-4)
IF INKEY-42 PROCshifty(vert%)
IF INKEY-58 PROCshifty(-vert%)
auto1%+=G%:IF auto1%>top% auto1%-=F%
auto2%+=4:IF auto2%>top% auto2%-=F%
WAIT
PROCscroll(X%+Y%,frame0%,width0%,height0%)
PROCscroll(auto1%,frame1%,width1%,height1%)
PROCscroll(auto2%,frame2%,width2%,height2%)
UNTIL FALSE
END
:
DEF PROCerror
MODE 12
IF ERR<>17 PRINT REPORT$ " @ ";ERL
ENDPROC
:
DEF PROCinitialise
mode%=13           :REM only thing to change for different modes
SYS"OS_ReadModeVariable",mode%,7 TO ,,F%    :REM checks the mode
SYS"OS_ReadModeVariable",mode%,3 TO ,,col%  :REM we want not the
IF col%<63 ERROR 0,"Not a 256 colour Mode"  :REM current one
DIM block% 19
block%!0=150
block%!4=-1
SYS "OS_ReadVduVariables",block%,block%+8
IF block%!8<2*F% ERROR 0,STR$(F%DIV512)+"k needed for screen"
:
MODE mode%
OFF
block%!0=149  :REM Now we want info for
block%!4=6    :REM the current mode
block%!8=-1
SYS "OS_ReadVduVariables",block%,block%+12
E%=block%!12
G%=block%!16
COLOUR 131
CLS
PRINT TAB(9,2) "Windowed Scrolling"
PRINT TAB(5,13) "Scroll" SPC3  "Z  X  '  /"
PRINT TAB(5,14) "Move" TAB(13,14) CHR$136 "  " CHR$137 "  " CHR$139 "  " CHR$138
PRINT TAB(5,15) "Escape to Stop"
xmult%=1280 DIV G%
ymax%=F% DIV G%       :REM everything hangs on G% and F%
ymult%=1024 DIV ymax%
vert%=G%<<2
edge%=G%-1
top%=F%-1
X%=0
Y%=0
auto1%=0
auto2%=0
frame2%=G%*32+G% DIV 8
frame1%=G%*32+G% DIV 2
frame0%=G%*136+G% DIV 8
width2%=G% DIV 4
width1%=G% DIV 4
width0%=G% DIV 2
height2%=G%<<6
height1%=G%<<6
height0%=G%<<6
ENDPROC
:
DEF PROCdraw
*FX 112 2
CLG
FOR I%=0 TO 99
GCOL 15+RND(47)
R%=8+RND(100)
x%=R%+RND(1279-R%)
y%=R%+RND(1023-R%)
CIRCLE FILL x%,y%,R%
IF y%+R%*2>1023 CIRCLE FILL x%,y%-1024,R%
IF x%+R%*2>1279 THEN
CIRCLE FILL x%-1280,y%,R%
IF y%+R%*2>1024 CIRCLE FILL x%-1280,y%-1024,R%
ENDIF
NEXT
*FX 112 1
GCOL 3 TINT 0
ENDPROC
:
DEF PROCassemble
DIM code% &100
storestart=0
storeindex=0
dispstart=1
dispindex=1
dispwidth=2
inc=2
dispheight=3
dispend=3
screenbase=4
storeend=4
screensize=5
linelength=6
endofline=7
storebase=8
lowreg=9
stepcount=10
highreg=12
link=14
FOR I%=0 TO 2 STEP 2
P%=code%
[ OPT I%
ADD dispindex,screenbase,dispstart
ADD dispend,dispindex,dispheight
ADD endofline,dispindex,dispwidth
SUB inc,linelength,dispwidth
ADD storebase,screenbase,screensize
ADD storeindex,storebase,storestart
ADD storeend,storebase,screensize
SUB storeend,storeend,#16
;
.loop
CMP storeindex,storeend      ; could enter with screen address
BGE fudge                    ; right on the boundary
LDMIA(storeindex)!,
STMIA(dispindex)!, ; slop 4 regs over
;
.stopfudge
CMP dispindex,endofline
ADDGE storeindex,storeindex,inc
ADDGE dispindex,dispindex,inc
ADDGE endofline,endofline,linelength
CMP dispindex,dispend
BLT loop
;
.end
MOV PC,link
;
.fudge                    ; deals with last & first
ADD storeend,storeend,#16 ; 4 regs at screen ends
MOV stepcount,#8          ; could be 1,2 or 3
;
.fudgeloop
CMP storeindex,storeend
SUBGE storeindex,storeindex,screensize
CMP dispindex,endofline
ADDGE storeindex,storeindex,inc
ADDGE dispindex,dispindex,inc
ADDGE endofline,endofline,linelength
CMP dispindex,dispend
BGE end
LDR lowreg,[storeindex],#4         ; only move
STR lowreg,[dispindex],#4          ; 1 reg over
SUBS stepcount,stepcount,#1
BNE fudgeloop
B stopfudge
]
NEXT
ENDPROC
:
DEF PROCshiftx(x%)
le%=(frame0% MOD G%)*xmult%
ri%=((frame0%+width0%)MOD G%)*xmult%
IF x%<0 AND le%=0 OR x%>0 AND ri%=0 ENDPROC
lo%=(ymax%-((frame0%+height0%)DIV G%))*ymult%
hi%=(height0% DIV G%)*ymult%
IF x%>0 RECTANGLE FILL le%,lo%,4*xmult%,hi% ELSE
 RECTANGLE FILL ri%-4*xmult%,lo%,8*xmult%,hi%
frame0%+=x%
ENDPROC
:
DEF PROCshifty(y%)
lo%=(ymax%-((frame0%+height0%)DIV G%))*ymult%
hi%=(ymax%-(frame0% DIV G%))*ymult%
IF y%>0 AND lo%=0 OR y%<0 AND hi%>=ymax%*2 ENDPROC
le%=(frame0% MOD G%)*xmult%
ri%=(width0% MOD G%)*xmult%
IF y%<0 RECTANGLE FILL le%,lo%,ri%,4*ymult% ELSE
 RECTANGLE FILL le%,hi%-4*ymult%,ri%,4*ymult%
frame0%+=y%
ENDPROC
:
DEF PROCscroll(A%,B%,C%,D%)
CALL code%
ENDPROC
The heart of scroll action itself consists of maintaining a pointer to the start of the displayed portion of the scroll area, which is then modified by four byte values for horizontal movement or 320 byte (one line) values for vertical movement. For greater flexibility the actual display position on the screen can be altered by modifying its pointer in a similar way.
These parameters, with the display width and height, are used by the ARM code routine to transfer the data from the scroll area to the visible screen. The routine first calculates the screen base offsets for the start and end points of the display, with the end of line marker, and a difference figure used after each display line has been plotted. This sets the display pointer to the start of the next line. The scroll area pointers and limits are set in a similar manner, then the main transfer loop is entered.
The main problem here is that of alignment against speed. As before byte alignment has been abandoned completely so that whole registers can be used easily. However, even this is not good enough for manipulating the huge amounts of memory that has to be quickly transferred. Four word handling gives the necessary speed but, being simplistic and only allowing four word scrolling steps, is unreasonable.
A difficulty arises when the window on the scroll area overlaps the end of the screen end. The main loop handles only four registers at a time, or 16 bytes. If there was, say, a one word overlap and no special allowance made, the routine would try to write three words into a prohibited area. This is the reason for the fudge routine. To allow for all contingencies the end of store marker is reduced by four words, and if the store index reaches this value, eight registers are transferred one at a time, continually checking for the true end of the scroll area. Once this has been reached the store index is decremented by an entire screen so that the routine correctly manages a wrap and carries on from this point. Once all eight register transfers have been made the main is re-entered and four register blocks are transferred as before.
The result is that there is a smooth, fast scrolling action, with four register transfers made for all but an insignificant amount of time. There is however, still one problem. If you scroll the user window carefully sideways, you will see that every so often it jumps one line up or down, depending on the scroll direction. This is because I've used a simple line adding system for the store memory. What is happening is that as the store index is incremented it makes no allowance for the fact that at the end of a line the screen should wrap back to the same line, not the next line as happens when you just keep counting up through the screen. To cure this you need to change the program so the store index is incremented by re-calculating the start of each line, then adding an extra check to subtract a whole line from the index if it goes through a line boundary.
As a point of interest the entry to the code itself is wrapped up in a procedure so that three separate calls can be made to it with independent parameters, while the code just accepts register values taken from the same resident integers.
10.7 Some Final Points
Integer multiplication is often required within ARM code. There is a temptation to just use the MUL instruction, but this can be very inefficient. Ideally you should try to plan your routines so that wherever possible powers of two are employed. All you then need to do is barrel shift left for multiplication, or right for division.
A point worth keeping in mind is the way you can produce a range of seemingly complex fast multiplications with combinations of barrel shifting, addition and subtraction. Look at the examples below. All of them, with just one instruction, take the value in R0 and without corrupting it produce a result in R1.
ADD R1,R0,R0,LSL#1    ; x2+x1    gives x3
ADD R1,R0,R0,LSL#2    ; x4+x1    gives x5
RSB R1,R0,R0,LSL#3    ; x8-x1    gives x7
ADD R1,R0,R0,LSL#3    ; x8+x1    gives x9
10.7.1 Random Numbers
Below is a practical application of this that also introduces a simple ARM code random number generator. The number generator creates a random integer, whereas we want a one-of-five selection. It is tempting to just mask this to get the range you want. However this won't work except where the required range is a power of two. With some values masking appears to work but actually doubles the chance of certain numbers appearing. The answer is to mask out one byte, multiply it by the range we want, then divide by 256. In the example given we end up with a random number between 0 and 4, a range of 1 to 5, as required,
.random
LDR R0,seed
CMP R0,#0    ; traps zero seed
MOVEQ R0,#255    ; omit seed is never zero
MOV R2,#17
;
.random_loop
MOV R1,R0,ASR #13
EOR R1,R1,R0,ASR #24
MOVS R1,R1,ROR #1
ADCS R0,R0,R0
SUBS R2,R2,#1
BNE random_loop
STR R0,seed
AND R0,R0,#&FF    ; mask 0 - 255
ADD R0,R0,R0,LSL#2    ; * 5
MOV R0,R0,LSR#8    ; / 256
MOV PC,link
;
.seed
EQUD 1234    ; any number except zero
10.7.2 Square Roots
One problem with ARM code programming is that important, complex routines provided within Basic are no longer available. One of these is for calculating square roots. There are a number of algorithms for this, but I'll stick to the two simplest methods. The first is the iterative method. For this, you simply guess at the number, then multiply it by itself to square it. If the result is too high, you make a downward adjustment to the guess, if the result too was too low, you adjust up. The adjustment steps are made progressively smaller until you reach the required accuracy.
The second method is a simple additive method. All you do is keep adding progressively higher and higher odd numbers, keeping a count of how many you add, until your total exceeds the number to be square rooted. The count is then the integer part of the square root. This method is extremely fast for small numbers but gets progressively slower as the numbers increase. If you add even numbers instead of odd numbers you get a more useful figure. This is an integer value for the nearest value rather than the one immediately below the correct floating point figure.
Listing 10.7 shows both of these methods and a comparison with Basic, along with their timings for significant numbers.
REM > Roots
:
MODE 12
PROCassemble
:
M%=6000
PROCtest(25,M%)
PROCtest(&419,M%)
PROCtest(&10133,M%)
PROCtest(&FFFFFF,M%)
END
:
DEF PROCtest(B%,M%)
PRINT''M% " iterations finding root of ";B%
:
TIME=0
FORI%=0TOM%:A%=SQRB%:NEXT
PRINT TIME" centi-seconds Basic SQR" SPC11 "Result is ";SQR B%
:
TIME=0
FORI%=0TOM%:A%=USRC%:NEXT
PRINT TIME" centi-seconds Iterative method" SPC4 "Result is ";A%
:
TIME=0
FORI%=0TOM%:A%=USRD%:NEXT
PRINT TIME" centi-seconds Additive method" SPC5 "Result is ";A%
:
TIME=0
FORI%=0TOM%:A%=USRE%:NEXT
PRINT TIME" centi-seconds Dummy code"
ENDPROC
:
DEF PROCassemble
DIM C% &100
root=0
number=1
test=2
step=3
comp=4
shift=5
mult=6
link=14
FOR I%=0 TO 2 STEP 2
P%=C%
[ OPT I%
MOV root,number,LSR#1
MOV step,root,LSR#1
CMP number,#&15000  ; adjust for big numbers
MOVGT shift,#1
MOVLE shift,#0
CMPGT number,#&2D000  ; very big numbers
ADDGT shift,shift,#1
CMPGT number,#&5A000  ; even bigger ones
ADDGT shift,shift,#1
CMPGT number,#&B5000  ; enormous numbers
ADDGT shift,shift,#1
CMPGT number,#&168000 ; stupendous ones
ADDGT shift,shift,#1
CMPGT number,#&2D4000 ; wow!
ADDGT shift,shift,#1
CMPGT number,#&5A0000 ; phew!
ADDGT shift,shift,#1
CMPGT number,#&B40000 ; the limit
ADDGT shift,shift,#1
MOV comp,number,LSR shift
MOV comp,comp,LSR shift
;
.iterloop
MOV mult,root,LSR shift
MUL test,mult,mult
CMP test,comp
ADDLT root,root,step
SUBGT root,root,step
MOVGTS step,step,LSR#1
BNE iterloop
MOV PC,link
;
.D%
MOV root,#0
;
.addloop
ADD root,root,#1
SUBS number,number,root,LSL #1
BGE addloop
;
.E%
MOV PC,link
]
NEXT
ENDPROC
When you run the program you will see that the Basic algorithm is fairly consistent for both speed and accuracy, bearing in mind it handles floating point numbers. The additive method starts out by far the fastest, but gets dramatically slower with the largest numbers. Handling purely integers, its accuracy increases proportionately with the larger numbers. The iterative method holds its speed quite well, but the accuracy is rather variable. This is because of the ranging adjustments that are made. The worst case error case by these adjustments is nearly 5% for numbers just higher than the last adjustment value.
10.7.3 Fast Circles
It would seem logical to assume that you could devise a circle plotting routine that was considerably faster than the one built into RISC OS. As you don't have to make Mode and colour translation tests there should be an improvement in speed. If you limit the circles to those fully on screen there isn't the problem of edge testing either. However, for circle plotting you can't avoid some byte manipulation, and if you just perform a byte by byte plot, you won't make much improvement in speed.
The answer is to perform a variation on the fudge idea that was introduced earlier. Starting each line from the left you perform a byte by byte plot until your plotting index is word aligned. You then carry on plotting whole words until there are no more complete words that can be fitted in. Finally you finish off the line, plotting byte by byte again.
Listing 10.8 achieves just this and manages to plot circles in about half the the time taken by the RISC OS plotter. The algorithm used is an interesting adaptation of Pythagoras that gives the perimeter of the circle without needing any polar calculations. When plotting small circles the implementation breaks down a bit, and the circles become rather angular, so you may be better off reverting to the RISC OS plotter for these. For very small ones you can just plot a handful of bytes from a look up table.
REM > Circles
:
REM A% = X co-ordinate in bytes
REM B% = Y co-ordinate in lines
REM C% = radius in bytes
REM D% = absolute colour
:
ON ERROR PROCerror:END
PROCinitialise
PROCassemble
REPEAT
D%=15+RND(47)*4
C%=5+RND(128)
A%=C%DIV2+RND(F%-C%)
B%=C%DIV2+RND(G%-C%)
IFINKEY-99 WAIT
CALL code%
UNTIL FALSE
:
DEF PROCerror
MODE 12
IF ERR<>17 PRINT REPORT$ " @ ";ERL
ENDPROC
:
DEF PROCinitialise
MODE 13
OFF
PRINT TAB(13,6) "Fast Circles" TAB(8,12) "Press any key to start"
 TAB(6,14) "Hold Spacebar to slow down" TAB(12,16) "Escape to stop"
IF GET
ENDPROC
:
DEF PROCassemble
DIM block% 27
!block%=149
block%!4=6
block%!8=7
block%!12=-1
SYS "OS_ReadVduVariables",block%,block%+16
E%=block%!16         : REM screen base
F%=block%!20         : REM bytes per line
G%=(block%!24)DIV F% : REM number of lines
DIM code% &180
horiz=0
count=0
vert=1
linesqr=1
radius=2
colour=3
screenadd=4
lines=4
screenline=5
radsqr=6
upper=7
lower=8
diff=9
shift=10
upperleft=11
lowerleft=0
blockright=12
right=1
link=14
FOR I%=0 TO 2 STEP 2
P%=code%
[ OPT I%
ADD colour,colour,colour,LSL#8
ADD colour,colour,colour,LSL#16
ADD upper,screenadd,horiz
MUL vert,screenline,vert
ADD upper,upper,vert
SUB lower,upper,screenline
MOV lines,#0
MUL radsqr,radius,radius
;
.vertloop
MUL linesqr,lines,lines
SUB count,radsqr,linesqr
MOV diff,#1
;
.widthloop
ADD diff,diff,#1
SUBS count,count,diff,LSL #5  ; adjust for width
BGT widthloop
ADD right,lower,diff
SUB upperleft,upper,diff
SUB lowerleft,lower,diff
ANDS shift,lowerleft,#3
BEQ block
RSB shift,shift,#4
SUB diff,right,lowerleft
CMP diff,shift
MOVLT shift,diff
;
.leftloop
STRB colour,[lowerleft],#1
STRB colour,[upperleft],#1
SUBS shift,shift,#1
BNE leftloop
CMP diff,#4
BLT nomore
;
.block
SUB blockright,right,#4
CMP lowerleft,blockright
BGE rightloop
;
.mainloop
STR colour,[lowerleft],#4
STR colour,[upperleft],#4
CMP lowerleft,blockright
BLT mainloop
;
.rightloop
STRB colour,[lowerleft],#1
STRB colour,[upperleft],#1
CMP lowerleft,right
BLT rightloop
;
.nomore
ADD upper,upper,screenline
SUB lower,lower,screenline
;
ADD lines,lines,#4
CMP lines,radius
BLE vertloop
MOV PC,link
]
NEXT
ENDPROC
10.7.4 Clipping
All the examples in this chapter have assumed that the objects being plotted will remain within the screen boundaries. While this is highly desirable, from the programming point of view, there are times when you want to define sprites that go off the edge of the screen. If you just let them overlap the edges, the results will be pretty disasterous. What you have to do is to calculate the minimum and maximum values for the start and end points of you sprites, both vertically and horizontally, then compare the sum of the sprite coordinates and its size, with the boundary figures you calculated. If your sprite is outside these limits you adjust its perimeter accordingly. Don't forget that you will also need to adjust the byte, or line count to ensure that you don't just push the sprite to a different position.
To make this clearer, figure 10.3 shows a number of clipping situations.