| Beginner's Guide to WIMP Programming |
|
| Martyn Fox |
13: Drawing Shapes
Each time we click Select on our window, we will add an instruction to our Plot Instruction List. The coordinates will be taken from the mouse position, and the colour and PLOT command from the selections made with the dialogue box.
Clicking Adjust will remove the last instruction from the list. In both cases, the window's visible area will be redrawn, so that the change can be seen instantly.
We first need to load the dialogue box from the template file, and create its window, which we do with some extra lines in PROCload_templates:
 1240 DEFPROCload_templates
 1250 REM opens window template file, loads and creates window
 1260 SYS "Wimp_OpenTemplate",,"<Shapes$Dir>.Templates"
 1270 REM ****** load and create Info box ******
 1280 SYS "Wimp_LoadTemplate",,stack%,ws%,wsend%,-1,"progInfo",0 TO ,,ws%
 1290 $stack%!(88+32*0+20)=version$
 1300 SYS "Wimp_CreateWindow",,stack% TO info%
 1310 REM ****** load and create main window ******
 1320 SYS "Wimp_LoadTemplate",,stack%,ws%,wsend%,-1,"Main",0 TO ,,ws%
 1330 SYS "Wimp_CreateWindow",,stack% TO main%
 1340 REM ****** load and create Options dialogue box ******
 1350 SYS "Wimp_LoadTemplate",,stack%,ws%,wsend%,-1,"Options",0 TO ,,ws%
 1360 SYS "Wimp_CreateWindow",,stack% TO options%
 1370 REM ****** end of window creation ******
 1380 SYS "Wimp_CloseTemplate"
 1390 ENDPROC
 1400 :
This creates our dialogue box and gives it the window handle options%.
To use the dialogue box, we need a menu we can open from the window. Using our existing function FNmake_menu, adding a further menu is easy. We just need a short new procedure:
 2590 DEFPROCwindow_menu
 2600 RESTORE +1
 2610 DATA Shapes,Options,*
 2620 wmenu%=FNmake_menu
 2630 ENDPROC
 2640 :
This creates a menu with just one item, which leads to the dialogue box.
To call this procedure and attach the dialogue box to the menu, add two lines to PROCmenus:
 1800 DEFPROCmenus
 1810 REM create menus and attach submenus and dialogue boxes
 1820 PROCmain_menu
 1830 PROCattach(mainmenu%,0,info%)
 1840 PROCwindow_menu
 1850 PROCattach(wmenu%,0,options%)
 1860 ENDPROC
 1870 :
All we need to do now is to add a line to open the menu when we click Menu on the window. We already have a call in PROCmouseclick to a procedure to handle clicks over the main window, PROCwindow_click, but at present all it does is to issue a beep. Let's get rid of that VDU 7 and replace it with a CASE ... OF ... ENDCASE structure to test the mouse buttons for Menu:
 1720 DEFPROCwindow_click
 1730 REM handles mouse clicks on window
 1740 REM b%!0=mousex,b%!4=mousey:b%!8=buttons:
      b%!12=window handle (-2 for icon bar):b%!16=icon handle
 1750 CASE b%!8 OF
 1760   WHEN 2:PROCshowmenu(wmenu%,!b%,b%!4)
 1770 ENDCASE
 1780 ENDPROC
 1790 :
This will tell the Wimp to open the menu whose data block starts at wmenu%, with its top left-hand corner at the mouse pointer.
This version of the listing is in the Steps directory as page_119.
You should now be able to open the dialogue box via the menu, and you will find that you can click on the four left-hand icons and move the selection from one to another, though, at the moment, you will have to press Esc or click outside the window to close the menu structure again.
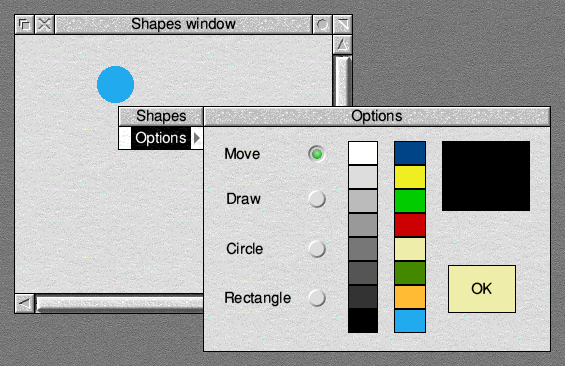
Obviously, just being able to select icons like this is not a great deal of use. The novelty soon wears off, and we start wanting our dialogue box to do something useful. To do this, we need to be able to find out which icon is selected.
Checking the Icon State
This is actually quite easy. All you need to do is to get the icon flag information, using Wimp_GetIconState, and see if bit 21 is set. The window doesn't even have to be open. We will use a simple function to do this: we just tell it the window and icon handles, and it returns TRUE if the icon is selected, and FALSE if not:2690 DEFFNicon_state(window%,icon%) 2700 LOCAL c% 2710 c%=FNstack(40) 2720 !c%=window% 2730 c%!4=icon% 2740 SYS "Wimp_GetIconState",,c% 2750 PROCunstack(c%) 2760 =((c%!24) AND (1<<21))<>0 2770 :
This will become a general-purpose function, to be included in our Wimp shell program, so it could easily be called when the data block at b% is in use. To avoid complications, therefore, it uses the new stacking procedures from our Wimp shell to claim and discard stack memory temporarily for use by c%.
We pass the window and icon handles to FNicon_state when we call it and it uses these to call Wimp_GetIconState. Line 2760 checks the state of bit 21 of the icon flags, and returns TRUE if it is set, or FALSE if not. With this function, we can easily check the state of any icon in any window.
Note that it does not matter that the stack memory reserved for c% is released before the last line of the function, which returns a calculation based on c% (and hence refers to the memory that has just been released), because the unstacking procedure only alters the value of the stack pointer variables and does not affect the stack contents. After the call to PROCunstack, we have returned the memory that we have just used for the next time a procedure needs to use the stack, by resetting the pointers, but the contents of the stack itself, and hence our local c%, are unaffected and are still available for use.
Now to our drawing routine. We need to produce a word containing the x and y window coordinates of the mouse, the colour in which we wish to draw and the PLOT code for the operation. We will use a variable called colsel% for the colour, and set it to 7 for the default colour of black, with a line in PROCinit:
 1470 DEFPROCinit
 1480 REM initialisation before polling loop starts
 1490 DIM b% 255,ws% 1023,menspc% 1023,stack% 1023,list% 1023
 1500 wsend%=ws%+1024:stackend%=stack%+1024:stackptr%=stack%
 1510 quit%=FALSE
 1520 !list%=&4067C32:list%!4=&9D043C32:list%!8=-1
 1530 colsel%=7
 1540 PROCload_templates
      etc.
Two more lines in PROCwindow_click will allow us to call routines for adding or removing drawing operations. The procedure now looks like this:
 1740 DEFPROCwindow_click
 1750 REM handles mouse clicks on window
 1760 REM b%!0=mousex,b%!4=mousey:b%!8=buttons:
      b%!12=window handle (-2 for icon bar):b%!16=icon handle
 1770 CASE b%!8 OF
 1780   WHEN 2:PROCshowmenu(wmenu%,!b%,b%!4)
 1790   WHEN 1:PROCdelete_item
 1800   WHEN 4:PROCadd_item
 1810 ENDCASE
 1820 ENDPROC
 1830 :
Remember that all mouse clicks anywhere on the screen connected with our application window come here, and that we have already checked for the window handle in PROCmouseclick, so the CASE ... OF... ENDCASE structure in PROCwindow_click need only worry about checking which button was clicked. In some applications, we may need to add another CASE ... OF... ENDCASE structure level, checking which icon we clicked on! Here, though, we do not need to go to such lengths.
When we click Select, line 1800 sends us to PROCadd_item, the procedure for adding a PLOT operation to our list, which in turn calls two more routines:
 2780 DEFPROCadd_item
 2790 x%=!b%:y%=b%!4
 2800 PROCget_origin(main%,xorig%,yorig%)
 2810 coords%=FNend
 2820 IF coords%<list%+1020 THEN
 2830 CASE TRUE OF
 2840   WHEN FNicon_state(options%,0):plot%=4:REM MOVE
 2850   WHEN FNicon_state(options%,1):plot%=5:REM DRAW
 2860   WHEN FNicon_state(options%,2):plot%=157:REM CIRCLE FILL
 2870   WHEN FNicon_state(options%,3):plot%=101:REM RECTANGLE FILL
 2880   OTHERWISE:plot%=4:REM MOVE - all icons deselected
 2890 ENDCASE
 2900 !coords%=(((x%-xorig%) AND &FFC) DIV 4)+((yorig%-y%) AND
      &FFC)*(1<<12)+(colsel% AND &F)*(1<<10)
 2910 coords%?3=plot%
 2920 coords%!4=-1
 2930 PROCforce_redraw(main%)
 2940 ENDIF
 2950 ENDPROC
 2960 :
 2970 DEFFNend
 2980 LOCAL n%
 2990 n%=list%
 3000 WHILE !n%<>-1
 3010   n%+=4
 3020 ENDWHILE
 3030 =n%
 3040 :
 3050 DEFPROCforce_redraw(window%)
 3060 LOCAL c%
 3070 c%=FNstack(36)
 3080 !c%=window%
 3090 SYS "Wimp_GetWindowState",,c%
 3100 SYS "Wimp_ForceRedraw",-1,c%!4,c%!8,c%!12,c%!16
 3110 PROCunstack(c%)
 3120 ENDPROC
 3130 :
During PROCadd_item, we shall want to redraw the window's visible area, and also find the end of the Plot Instruction List. As these are both things we'll want to do several times, we are using a couple of routines to do them for us.
PROCforce_redraw uses the window handle in stack memory to call Wimp_GetWindowState, which tells it the screen coordinates of the window's visible area. It uses these in a call to Wimp_ForceRedraw which results in the visible area being redrawn. When Wimp_ForceRedraw is called, R0 contains -1, which means that the remaining registers contain screen coordinates rather than window coordinates.
The function FNend simply checks through the Plot Instruction List, looking for the word at the end containing -1, and returns its address when it finds it.
Producing a New PLOT Instruction
If you check back on PROCmouseclick, you will see that the x and y coordinates of the mouse pointer are in b% and b%+4 respectively. Line 2790 in PROCadd_item stores these coordinates in x% and y%, ready for later use.We need to know the coordinates of the window's work area origin, to convert screen coordinates to window coordinates, so we call PROCget_origin in line 2800.
The rest of the procedure generates our new Plot instruction word, puts it in place of the existing word containing -1, and adds a new -1 after it, extending the Plot Instruction List by four bytes.
Line 2820 first checks we are not already at the end of our 1,000 bytes - we do not want to over-write something important!
The CASE TRUE OF statement is a useful way of testing a number of different conditions, only one of which is true. You could, for example, use it like this:
CASE TRUE OF
  WHEN a%=b%:PROCdo_this
  WHEN c%=d%:PROCdo_that
ENDCASE
You would only use this method, though, when you never want to call both PROCdo_this and PROCdo_that.
In the case of PROCadd_item, between lines 2840 and 2870 we're checking to see which of our four icons is selected. We only want one, and there can never be more than one selected at a time anyway, because of the action of their exclusive selection group.
This is why it was important for the icons to be numbered in the right order: icon zero, whose text says 'Move', gives us the PLOT code for MOVE, and so on.
Line 2880 deals with the situation where none of the four radio icons is selected. This could happen if you were to click Adjust on the currently selected icon, which would turn it off. If this happens, the program assumes you've selected MOVE.
Line 2900 puts the coordinates and colour data together in three bytes of the four-byte word we want to store - the reverse of the process in PROCdraw. Don't worry if you do not follow the bit manipulation exactly - it takes a lot of working out!
The fourth byte of the word, containing the PLOT code, has to be stored separately, to keep Basic happy. If the most significant bit of a four-byte integer is a '1', Basic treats it as a negative number, which is why &FFFFFFFF is -1. This means that we can't store a PLOT code higher than 127 in the top byte of !coords% using Basic; it has to be done separately, by line 2910.
It is now simply a case of storing -1 after our instruction, to mark the new end of the block, and redrawing the visible area.
Deleting Instructions
That takes care of the process of putting more lines, circles and rectangles on the screen. If we made a mistake, though, we would want to delete the last operation. We could do this by clicking the Adjust button anywhere in the window. This is a much simpler procedure:3140 DEFPROCdelete_item 3150 coords%=FNend 3160 IF coords%>list% coords%-=4:!coords%=-1 ELSE VDU 7 3170 PROCforce_redraw(main%) 3180 ENDPROC 3190 :
We are not bothered about coordinates this time. We simply have to find the -1 at the end of the data and put another -1 four bytes earlier, then redraw the visible portion again. We have to be careful, though. If the -1 is right at the beginning of the instruction block, because we haven't drawn anything, or perhaps because we've deleted everything, we mustn't put a -1 four bytes further back!
Line 3160 takes care of this particular problem, and also produces a beep if you try to delete back too far.
If you wish, you can now change line 1520 to remove the statements that gave us our initial circle, leaving just the -1 that we need to start with:
 1470 DEFPROCinit
 1480 REM initialisation before polling loop starts
 1490 DIM b% 255,ws% 1023,menspc% 1023,stack% 1023,list% 1023
 1500 wsend%=ws%+1024:stackend%=stack%+1024:stackptr%=stack%
 1510 quit%=FALSE
 1520 !list%=-1
 1530 colsel%=7
 1540 PROCload_templates
      etc.
Adding a Little Colour
Everything we've drawn so far has been in dreary old black. 'What about those coloured icons we created so laboriously in the dialogue box?', you're no doubt saying. Well, surprise, surprise, they can be used to select a colour for us!It is simply a case of changing the value of colsel%, which we set to 7 for black, when we were initialising.
It's also rather annoying to have to press Esc or click elsewhere to close the dialogue box!
To deal with these problems, we need to detect a mouse click on the dialogue box, so we add another line to PROCmouseclick:
  410 DEFPROCmouseclick
  420 REM handles mouse clicks in response to Wimp_Poll reason code 6
  430 REM b%!0=mousex,b%!4=mousey:b%!8=buttons:
      b%!12=window handle (-2 for icon bar):b%!16=icon handle
  440 CASE b%!12 OF
  450   WHEN -2:CASE b%!8 OF
  460     WHEN 2:PROCshowmenu(mainmenu%,!b%-64,96+2*44):
                 REM replace '2' with number of main menu items
  470     WHEN 4:!b%=main%:SYS "Wimp_GetWindowState",,b%:
                  b%!28=-1:SYS "Wimp_OpenWindow",,b%
  480   ENDCASE
  490   WHEN main%:PROCwindow_click
  500   WHEN options%:PROCopt_box(b%!8,b%!16)
  510 ENDCASE
  520 ENDPROC
  530 :
As PROCmouseclick is already complicated enough, again we create a new procedure, PROCopt_box, to handle the processing of clicks in the Options window, just as we created PROCwindow_click to cater for the main window. However, with PROCopt_box, we pass it two parameters: the mouse button state (b%+8) and the icon on which we clicked (b%+16). This is not strictly necessary, in that the contents of b% will still be available when PROCopt_box is called, and it's worth noting that we didn't bother to pass a button parameter when we called PROCwindow_click.
However, there are two good reasons for passing parameters this time. First of all, we are going to use these values several times in the procedure, so it makes sense to refer to them by name, and creating local variables by declaring them as parameters in the DEFPROC line is much more efficient than having to declare and assign them explicitly as local variables.
Secondly, we also need to retain their values in local variables because we are about to reuse b%, and hence overwrite its previous contents. It would be possible to use a local c% instead, taking advantage of our stacking routines again. However, in this case, it would be overkill to do so, and would result in unwanted extra complexity. PROCopt_box is specific to this application, and we know exactly how and when it will be called; it is not a general-purpose routine for the shell, which may easily be reused in unforeseen circumstances. We know in this case that it will do no harm to reuse b%.
PROCopt_box is defined as follows:
 3200 DEFPROCopt_box(button%,icon%)
 3210 CASE icon% OF
 3220   WHEN 0,1,2,3:
 3230   WHEN 5:
 3240     !b%=options%:b%!4=4
 3250     SYS "Wimp_GetIconState",,b%
 3260     colsel%=(b%!24)>>28
 3270     IF button%=4 SYS "Wimp_CreateMenu",,-1
 3280   OTHERWISE
 3290     !b%=options%:b%!4=icon%
 3300     SYS "Wimp_GetIconState",,b%
 3310     b%!4=4:b%!8=(b%!24) AND &F<<28:b%!12=&F<<28
 3320     SYS "Wimp_SetIconState",,b%
 3330 ENDCASE
 3340 ENDPROC
 3350 :
The version of the listing up to this stage is in the Steps directory as page_127.
We apply a CASE ... OF ... ENDCASE to the icon number. The effect of line 3220 is that nothing happens if we click on icons 0 to 3; these are the radio icons and all we want to do is change their state. Icon 4 is the box which indicates the currently selected colour. We don't have to deal with it here because it has a 'never' button type which means that our application isn't notified if we click on it.
We'll skip icon 5 for the moment and look at what happens if we click on one of the colour selection boxes. This is handled by the 'OTHERWISE' section of the CASE ... OF structure.
We need to know the background colour of the icon which was clicked on. The colour number is contained in the top four bits of the icon flags, which we can read using Wimp_GetIconState. You will recall that we used this call in FNicon_state. We put the window and icon handles in b% and b%+4 respectively and call the routine, which returns with the 32-byte icon data block, starting at b%+8. The icon flags are at b%+24.
The purpose of this part of the procedure is to set the background colour of icon 4 to that of the icon we clicked on. We do this with a call to Wimp_SetIconState. The first word of the data block already has the window handle, left over from the previous call, and we set b%+4 to the icon number in line 3310. The second statement on this line sets the top four bits of b%+8 to be the same as the top four bits of b%+24, which hold the background colour of the icon we clicked on. The remaining statement sets all four of the top bits of b%+12 to 1. The effect of all this is that the top four bits of icon 4's flags are first cleared to zero (due to b%+12), then Exclusive-ORed with the number in b%+8, causing the icon background colour to change. The final effect of Wimp_SetIconState is to redraw the icon.
When we click on icon 5, the OK button, with either Select or Adjust, we first get the background colour of icon 4, again using Wimp_GetIconState, then make it the value of the global variable colsel%, which controls which colour we plot in the window. Because we are interested in the top four bits of the icon flags, we don't have to use a mask, but simply shift the entire 32-bit number 28 places to the right and make colsel% what is left.
We test which button was clicked on icon 5 in order to obey standard RISC OS conventions: if Adjust was clicked we take no further action and leave the menu and dialogue open. However, if Select was clicked, we close the menu tree, which takes the dialogue box with it.
You can now draw lines, circles and rectangles in a window, using your newly-written application, and you may like to try modifying the program to allow you to use other types of PLOT action.
You're probably thinking 'What's the point of drawing lovely pictures with this application, if I can't save them?' That is what we will cover next.